Blog — Oh Magazine

Sarah McCoy

Recipe Friday: Meringue Girls Mojito Baked Alaskas

words Meringue Girls

15th April 2016

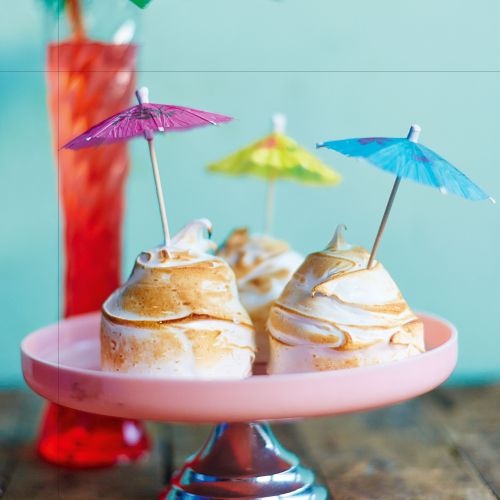
Baked Alaska is an absolute classic meringue recipe. We have given it a Meringue Girls twist by combining a zesty lime and coconut sponge with mojito sorbet and blowtorched brown sugar Italian meringue. A proper summer holiday on a plate. Don’t forget your cocktail umbrella!

You will need:

Makes 4

For the Mojito sorbet (cheats can get shop-bought from Waitrose!)

125ml fresh lime juice

4 tbsp Jamaican white rum

150g icing sugar

120ml water

zest of 1 lime

a handful of mint (roughly 20 leaves), finely slicedv

For the sponge:
170g softened unsalted butter

170g caster sugar

3 eggs

100g self-raising flour

70g desiccated coconut

juice and zest of 2 limes

For the brown sugar Italian meringue:
60g egg whites (from 2 medium eggs)

50g caster sugar

75g light brown sugar

30ml water

Equipment:
a sugar thermometer

a blowtorch

cocktail umbrellas

To make the mojito sorbet:

One. Put the lime juice, rum and icing sugar into a bowl and whisk until the sugar has dissolved. Stir in the water, lime zest and mint. Pour into an airtight container and freeze overnight. Due to the alcohol content this sorbet sets softly, so use it quickly.

To make the sponge:

One. Preheat the oven to 170°C/gas 5. Butter a large baking tin (approximately 24cm x 18cm) and line it with non-stick baking paper.

Two. In a large bowl or using a stand mixer, beat the butter and sugar together until light and fluffy. Add the eggs one at a time – the mixture may start to look split, but don’t worry. Add the flour, coconut, lime juice and zest and fold gently until you have a smooth batter. Pour the mixture into your baking tray and smooth the surface with a spatula or the back of a spoon, then bake for about 20 minutes, until the cake is golden and springs back when pressed.

Three. Run a knife around the edge of the tin, turn the cake on to a cooling rack and leave to cool completely. Once completely cool, cut out 8cm diameter circles from your sponge. We’ve used a cookie cutter, but a knife around a tumbler is fine.

To make the brown sugar Italian meringue:

One. Put the egg whites and 1 tablespoon of the caster sugar into the bowl of a stand mixer, fitted with the whisk attachment, or use a clean glass bowl with a hand-held whisk. Don’t start whisking yet.

Two. Put the remaining caster sugar, light brown sugar and water into a heavy-based saucepan and place over a medium/high heat. (Don’t stir, as this can cause the sugar to crystallize and you’ll get crunchy bits in your meringue!). Once the sugar has dissolved and the mixture is boiling, attach a sugar thermometer to the pan and continue to boil without stirring until the syrup reaches 120°C. Then take the pan off the heat.

Three. Now turn the mixer on to high speed and whisk the egg whites until stiff peaks form. Reduce the speed to low and carefully pour in the hot sugar syrup in a very slow steady stream. Be careful to add the syrup directly to the egg whites, without it touching the side of the bowl or the whisk on the way down, otherwise it will cool before it hits the eggs. Once all the syrup has been added, turn the mixer on to high speed and keep mixing until the sides of the bowl feel cool.

To assemble:

Finally. Place your four sponge circles in your desired serving dish. Using an ice cream scoop, place a perfect scoop of mojito sorbet on each sponge circle. Working quickly, cover the sorbet and sponge with Italian meringue – a mini palette knife is useful here. Blowtorch to a golden caramel colour and serve immediately with a cocktail umbrella.

If the above sounds like too much effort, head down to Broadway Market to buy ready made sweet treats. Original recipe and image from the MG’s latest book Meringue Girls: Everything Sweet out now and published by Square Peg.

Recipe Friday: Edible Flowers Lollipops with Sexy Sherbert

This month's Recipe Friday is hosted by the Meringue Girls, and for the second installment in the series we'll be making edible flowers lollipops with sexy sherbet!

We’ve opted for pansy lollies, but you can use any edible flowers you can get your hands on – such as violets or roses. This is an incredibly quick and easy recipe that creates a tongue-twisting trip down Memory Lane.

MAKES 18

For the edible flower lollipops:

· 225g granulated sugar

· 100ml glucose syrup

· 60ml water

· a couple of drops of natural passion fruit essence (or any other essence you desire!)

· edible flowers

For the sherbet:

· 300g icing sugar

· 1 tbsp citric acid

· 1 tsp bicarbonate of soda

· 3 tbsp freeze-dried fruit pieces (e.g. raspberry or strawberry)

Equipment:

· a pastry brush

· a sugar thermometer

· lollipop sticks

Combine the sugar, glucose syrup and water in a saucepan over a medium heat and stir until the sugar dissolves. When it comes to the boil, dab a pastry brush into a cup of tap water and brush down the sides of the pan just above the boil line to remove any sugar crystals that have formed.

Attach a sugar thermometer to the pan and allow the mixture to continue to boil, without stirring, until it reaches 154°C. Immediately remove from the heat. Add a few drops of your chosen flavouring and stir to combine.

You need to work quickly to form your lollies. On a silicone mat or a sheet of baking paper, put a blob of sugar syrup down and use the back of a spoon to smooth it out into a circular shape. Place your lollipop stick, then put an edible flower on top. Finish by covering the flower completely with more sugar syrup.

Allow to cool for 30 minutes at room temperature. Wrap the lollipops individually in cellophane, tie with string and store at room temperature for up to a month. They are sticky, so keep them separate from each other.

To make the sherbet, simply whiz all the ingredients in a food processor or mix together in a bowl to form a fine dust.

To serve up a sherbet fountain, fill a small shot glass with sherbet, place a liquorice stick or lollipop in the middle, and get fizzy.

Recipe Friday: Meringue Girls' Prosecco, Strawberry and Popping Candy Truffles

For this month’s recipe Fridays we are tucking into sugary treats thanks to the Meringue Girls! And to start us off we have some fizz popping truffles.

Homemade chocolate truffles are deceptively easy to make, yet so impressive. The perfect little treat for popping in your mouth when you’re sitting on the sofa, after dinner, or if you are planning a decadent high tea. Everyone’s heard of champagne truffles, but these use our fave fizzy Italian tipple – prosecco.

You will need

MAKES 25

For the truffle ganache:

280g good-quality dark chocolate (70%)

250ml double cream

50g unsalted butter

100ml Prosecco (drink the rest of the bottle while eating your truffles)

For coating:

60g freeze-dried strawberries

60g coated popping candy or normal ‘Fizz Wiz’ popping candy

One. Line a large baking tray with baking paper.

Two. Start by making the truffle ganache. Break the chocolate into squares and place in a large glass bowl. Heat the cream and butter in a saucepan over a low heat, and stir until the butter is melted. Let the cream reach a gentle simmer, then pour over the chocolate, whisking until it’s completely melted. Add the prosecco and whisk until combined. Pour the lot into a lined shallow tin and refrigerate for at least 4 hours, and preferably overnight.

Three. Mix your freeze-dried strawberries and popping candy together on a large plate and set aside.

Four. To shape the truffles, dip a melon baller or teaspoon into a cup of boiling water. Scrape up balls of the ganache, reshaping them with your hands if necessary, then drop them on to the plate of freeze-dried strawberries and popping candy*, rolling them around to get an even coverage.

Five. Repeat until you’ve used all the ganache. Place the truffles on a baking tray lined with baking paper and chill in the fridge for about 30 minutes before enjoying.

*Coated popping candy doesn’t absorb the moisture of the truffles, so the ‘POP’ stays until you bite into them. Uncoated ‘Fizz Wiz’ works well, but absorbs the moisture, so these are best eaten quickly. If you prefer to keep your truffles simple, just roll them in good-quality cocoa powder.

Original recipe and image from the MG’s latest book Meringue Girls: Everything Sweet out now and published by Square Peg.

Recipe Friday: Bread Ahead's Simnel Marzipan Moments

You will need

(Makes around 38 bite size balls)
250g ground almonds

125g caster sugar

125g icing sugar

2 tsp ground mixed spice

pinch of ground cinnamon

pinch of ground cloves

¼ tsp almond extract

¼ tsp vanilla extract

1 whole egg

1 egg yolk

1 tsp of lemon juice

1 tsp Honey

1 tsp Brandy

One. In a large bowl place the ground almonds, caster sugar, icing sugar and spices, then mix together.

Two. In a seperate bowl beat the whole egg, yolk, extracts, lemon juice, honey and brandy together and pour onto the almond mix and mix together well.

Three. Once the paste is made, roll out in around 15g balls nice and smooth (you should get around 38).

Four. Then using the blow torch or under a grill, singe the marzipan moments to a golden singe brown.Don’t be scare to burn them a little as it really adds to the depth of flavour which balances the sweetness and it is delicious.  

Recipe Friday: Bread Ahead’s The Nutter

These little treats from Bread Ahead were inspired by the bowl of nuts you always have at Christmas that are still sitting there in the spring, and all those half-opened packets of nuts that sit at the back of the cupboard. You can use any type of nuts, just keep the quantity the same in total.

Image @katesiobhantaylor

You Will Need:
Makes around 25
50g blanched almonds

50g blanched hazelnuts

50g walnuts

50g Brazil

50g macadamia

125g softened unsalted butter

125g caster sugar

1 eggs, beaten

150g plain flour, plus extra for dusting.

One. Roast all your nuts together in a preheated oven at 160c for 12-14 minutes or until golden brown and then leave to cool.

Two. Whizz up the nuts in a food processer or chop with a knife until they are small crumbs.

Three. In an electric mixer with the beater attachment, or in a bowl with a wooden bowl, cream the butter and sugar together until light and fluffy.

Four. Add eggs one at a time making sure all incorporated, then the flour and nuts and mix together, wrap the paste in cling film and chill in the fridge for a few hours.

Five. Take out the fridge and let soften a little but not too much as it will get sticky until you can roll out, roll out to 5mm thick and cut out using a 7cm cutter, place on a lined baking tray and bake in a preheated oven at 140c for 20-25 minutes or until golden brown.

Six. Leave them on the tray for 5 minutes, then put them on a rack to cool.

Seven. Once cool tuck in! 

Don't want to bake them yourself? Pop along to Borough Market on Saturday to pick up freshly baked treats. 

Recipe Friday: Bread Ahead’s Custard Tarts

From royal approval to marriage proposals, Bread Ahead’s tasty bakes speak straight to the heart. This week, we are sharing a heavenly custard tart; creamy, sweet and with a pinch of nutmeg these little tarts have caused so many impromptu proposals, they should come with a warning.

You Will Need
(Makes one large tart - cook a little less if making small ones)
Pastry
250g softened unsalted butter

160g caster sugar

20g soft light brown sugar

4 eggs yolks, plus 1 yolk for brushing

450g strong white bread flour

Pinch of salt

Filling
1 vanilla pod

800ml double cream

9 egg yolks

100g caster sugar

1 whole nutmeg for grating

One. First, the pastry. Put the butter and sugars into the bowl of an electric mixer with a beater attachment and cream together until white and fluffy.

Two. Add the egg yolks one at a time to help prevent them curling, then sift in the flour and salt and mix until all is incorporated.

Three. Turn out on to a lightly floured surface and bring together, then wrap in cling film and chill in the fridge for 5-6 minutes.

Four. Grease and flour a 30cm tart tin, 3-4cm deep. Take the pastry out the fridge and allow it to soften a little. Roll it out on a lightly floured surface to a circle about 35cm across and about 3mm thick, and line your prepared tart case with it. Chill for 2-3 hours in the fridge or 45 minutes in the freezer.

Five. Preheat the oven to 160c.Take the tart case straight from the fridge or freezer, cover with cling film and fill with baking beans,then bake for 25 minutes, or until the edges are golden brown.

Six. Remove the cling film and beans, then put the tart case back into the oven and bake for a further 8-10 minutes or until it is golden brown all over (DO NOT UNDER-BAKE THE TART CASE OTHERWISE YOU WILL HAVE A SOGGY BOTTOM).

Seven. Remove the tart case from the oven and brush with beaten egg yolk (this seals any holes), then place on a rack still in the tin and cool the pastry completely. 

Change the oven temperature to 140c.

The filling. 

Eight. Slit the vanilla pod lengthways and scrape out the seeds. Put the seeds and pod in a saucepan with the double cream and bring slowly to the boil to infuse the cream with the vanilla. 

Nine. In a large bowl, mix the egg yolks and sugar together just for a minute with a whisk. Then pour the boiling cream over the mixture, whisking constantly to prevent curdling.

Ten. Pass through a fine sieve, if there is lots of froth on top; just spoon it off and discard

Eleven. Pour the custard mix into the blind baked tart case, then grate the nutmeg on top.

Twelve. Place carefully in the oven without spilling any of down the sides of the pastry case; if you do, you will end up with soggy pastry, which is a no-no for a custard tart. Bake at 140°C/Gas Mark 1 for about 40 minutes, until there is only a small wobble in the center of the tart.

Thriteen. Take out of the oven and place on a cooling rack. Once cooled, feed to your loved ones with a cup of tea. 

Don't want to bake them yourself? Pop along to one of their shops on Saturday to pick up freshly baked treats.  

Recipe Friday: Bread Ahead’s Royal Buns

For this month's Recipe Friday, we'll be practicing proving and baking with Bread Ahead. Opened in 2013, Justin Gellatly and the rest of the team have gained royal clients with their buns.


Enriched with butter, these soft buns are fit for the most special of occasions, including the bacon buns the morning after the royal wedding! So why don’t you bake a batch this weekend and treat your mum like a royal.

You Will Need: 

(Makes 24 buns)


600g strong white flour (plus extra for dusting)

11g fine sea salt

44g caster sugar

330g water

22g fresh yeast, crumbled

100g softened unsalted butter, cubed

1 egg, beaten, to glaze

One. Place all of the ingredients apart from the butter in an electric mixer using the dough hook attachment and mix on a medium speed for 6-8 minutes or until it starts coming away from the sides. Then turn off the mixer and have a cuppa for 10 minutes while the dough rest. Don’t have a mixer? Use your hands, it’ll be sticky to begin with but keep going, it’ll get there.

Two. Start the mixer up again on a medium speed and slowly add the butter to the dough, once all the butter is added mix on a high speed for 1 minute, then turn off the mixer.

Three. Cover the bowl with cling film and let it rest for 10 minutes, then divide into 40g pieces and roll into balls and place on a lined baking tray and cover loosely with cling film. Prove until double in size (about 1 hour).

Four. Egg wash and bake in a preheated oven at 200c for around 10-12 minutes or until golden brown.

Five. While the buns are still warm fill them! Go wild, bacon, avocado, eggs, tomatoes, extra avocado -- fill them until your heart's content and then tuck in.

Don't want to bake them yourself? Pop along to Borough Market on Saturday to pick up freshly baked treats. 

Recipe Friday: A big bowl of Spring from My New Roots

This month we’ve been pinching recipes from our favourite food blogs. Last week Aimee-lee gave us Deliciously Ella’s tasty bean stew, but with the first signs of spring in the air, I couldn’t help embrace spring veggies like a much missed old friend.

This week’s recipe, slightly tweaked, comes from My New Roots and is a big bowl of spring wonderfulness, sure to leave you feeling like a daisy.

Spring Abundance Bowl
(Serves 4)

You will need:

125g quinoa, soaked if possible

1 tsp. sea salt

1 bunch asparagus, approx. 20 spears

250g shelled peas: frozen are fine if, it’s what is available to you

2 spring onion

1-2 ripe avocados

Sprouts of your choice: I chose pea sprouts, but any kind will work

1 lemon

Dill dressing: chop dill, mix into natural yogurt, voilà!

Pickled veg, if they’re in the cupboard

Directions:

One. Rinse quinoa well, drain and add to a pot with 1 ¾ cup water (2 cups if not soaked) and salt. Bring to a boil, cover and reduce to simmer until water is absorbed, 15-20 minutes. Zest 1 lemon into the pot, fluff with a fork and set aside.

Two. While the quinoa is cooking, prep the vegetables. Grill or steam the asparagus. Shell the peas (if you want to steam them, add them to the pot of quinoa 3-4 minutes before cooking time is up). Slice avocado and spring onion. Mix your dill and yogurt together, squeeze some lemon in if you’re feeling zesty.

Three. To serve, place ¼ of the cooked quinoa in a large bowl, add all veggies as desired, including some pickled veg if you’ve got them, drizzle with dressing and a squeeze lemon juice. Season to taste. Enjoy.

Original recipe and image by Sarah Britton of My New Roots. Sarah's debut book, My New Roots: Inspired Plant-Based Recipes for Every Season is out now and published by Macmillan.

Giveaway: Nathalie Bond Organics

For me, few things beat a good soak in the tub - lighting a candle and leaving the city bustle behind me is a slice of heaven. So when I spoke to Nat of Nathalie Bond Organics my heart melted as smoothly as their lemongrass candles. And with Mother’s Day just around the corner, one lucky person can win the whole range of products to pamper their mum (or maybe just themselves!).

When Nat fell pregnant her everyday beauty brands just stopped working for her; so she did some digging and found that on average, women apply 168 chemicals to their body every single day!

Nat, what are these chemicals? There are all sorts from synthetic perfumes to the chemical making soap foam, then there is alcohol and even water can be a challenging ingredient for sensitive skin. That’s why all of our products are oil based.

Do you have a favourite product? I just love the Peppermint and Eucalyptus Scrub, it’s a two-in-one product, because it has lots of lovely oils in it, I don’t need to moisturise! I really want to simplify beauty, our products are versatile, they don’t have one set use. Body oils can be used in the hair or for massaging -- it really is whatever you want it to be.

What’s on the cards for this year? One of our biggest dreams long term is that one day we would be able to own a farm on the edge of the city where we can grow our own ingredients and continue to employ local people.

And where can I get my hands on your products? Of course you can get everything online, but we do stock in a handful of places across the UK. The best thing to do is email and ask, that way we can let you know what products they stock too.

Every single delightful organic item is handmade, labelled and shipped from a tiny workshop in Sheffield on the edge of the Peak District National Park. The range includes handmade soap, lip salves, balms, body oils, scrubs, bath salts and essential oil candles.

For your chance to win over £100 worth of organic loveliness head over to Twitter, Instagram or Facebook and give both @ohcomelymag and @nathaliebond a follow and tell us why you should win with the #OCOrganic.

Secret Recipes Friday: Marmite Curry

words Tamara Vos, Photos Sophie Davidson

31st December 2015

The Secrets Issue was Tamara Vos' last at Oh Comely before leaving us (sad sigh) for a career in food styling. So it seemed too tempting a chance to miss to ask her to style some of your secret ingredients. We'll be serialising the photos and recipe ideas she created with photographer Sophie Davidson during December. 

Jon Mee makes marmite korma.

Jon says, "When my girls were small they didn’t like spicy food, so we always had to have a mild korma curry. It was so bland that it needed an extra something, and Marmite was the only thing in the cupboard. It gave the curry a bit of beefy richness, an extra kick, and I’ve done it ever since. I love Marmite. I spread it on toast as thick as you would chocolate spread, and have it in every sandwich, even if it’s a tuna one. I used to make Marmite Korma every Saturday night when we rented out a film, but now everyone is grown up and I’m retired, so any night could be Marmite Korma night!"